0.0: Plug-and-Play
This guide explains how to connect the Grid module(s) to your DAW and configure them once connected.
Out of the box, Grid controllers are set up for seamless DAW control and other applications. Users can easily utilize software-side MIDI mapping or MIDI learn functionality. This default setup allows you to connect multiple Grid modules and immediately configure pots, knobs, sliders, and buttons in your preferred DAW without needing to open Grid Editor.
Connect Grid to your DAW/VJ Software
So in the DAW/VJ Software we'll first have to enable our modules to be able to use them for MIDI mapping.
Let's start up a fresh project in your DAW of choice:
- Ableton
- Logic
- FL Studio
- ProTools
- Cubase
- Studio One
- Reaper
- Bitwig
- Arena
Here we should find our Grid module named 'Grid' or 'Intech Studio: AC'.
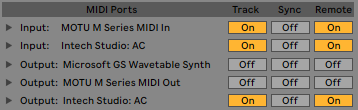
Now, what we want is to be able to send MIDI messages from Grid to your DAW, for this we have to enable both Track and Remote in the inputs section, like so.
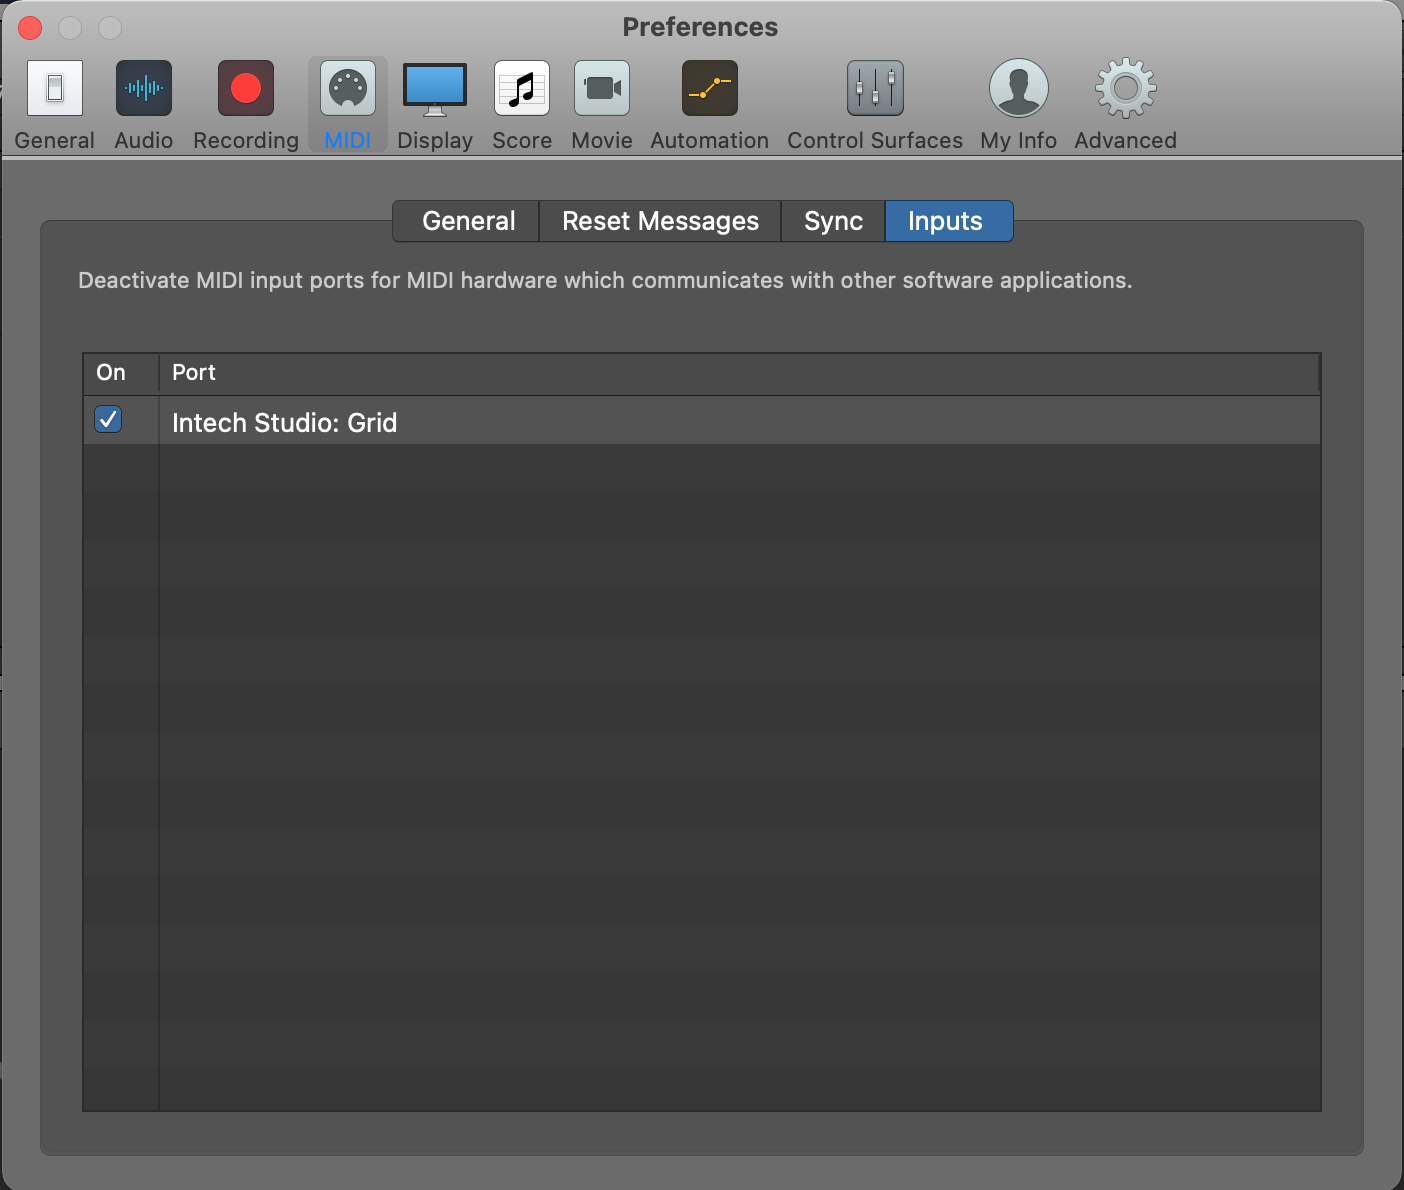
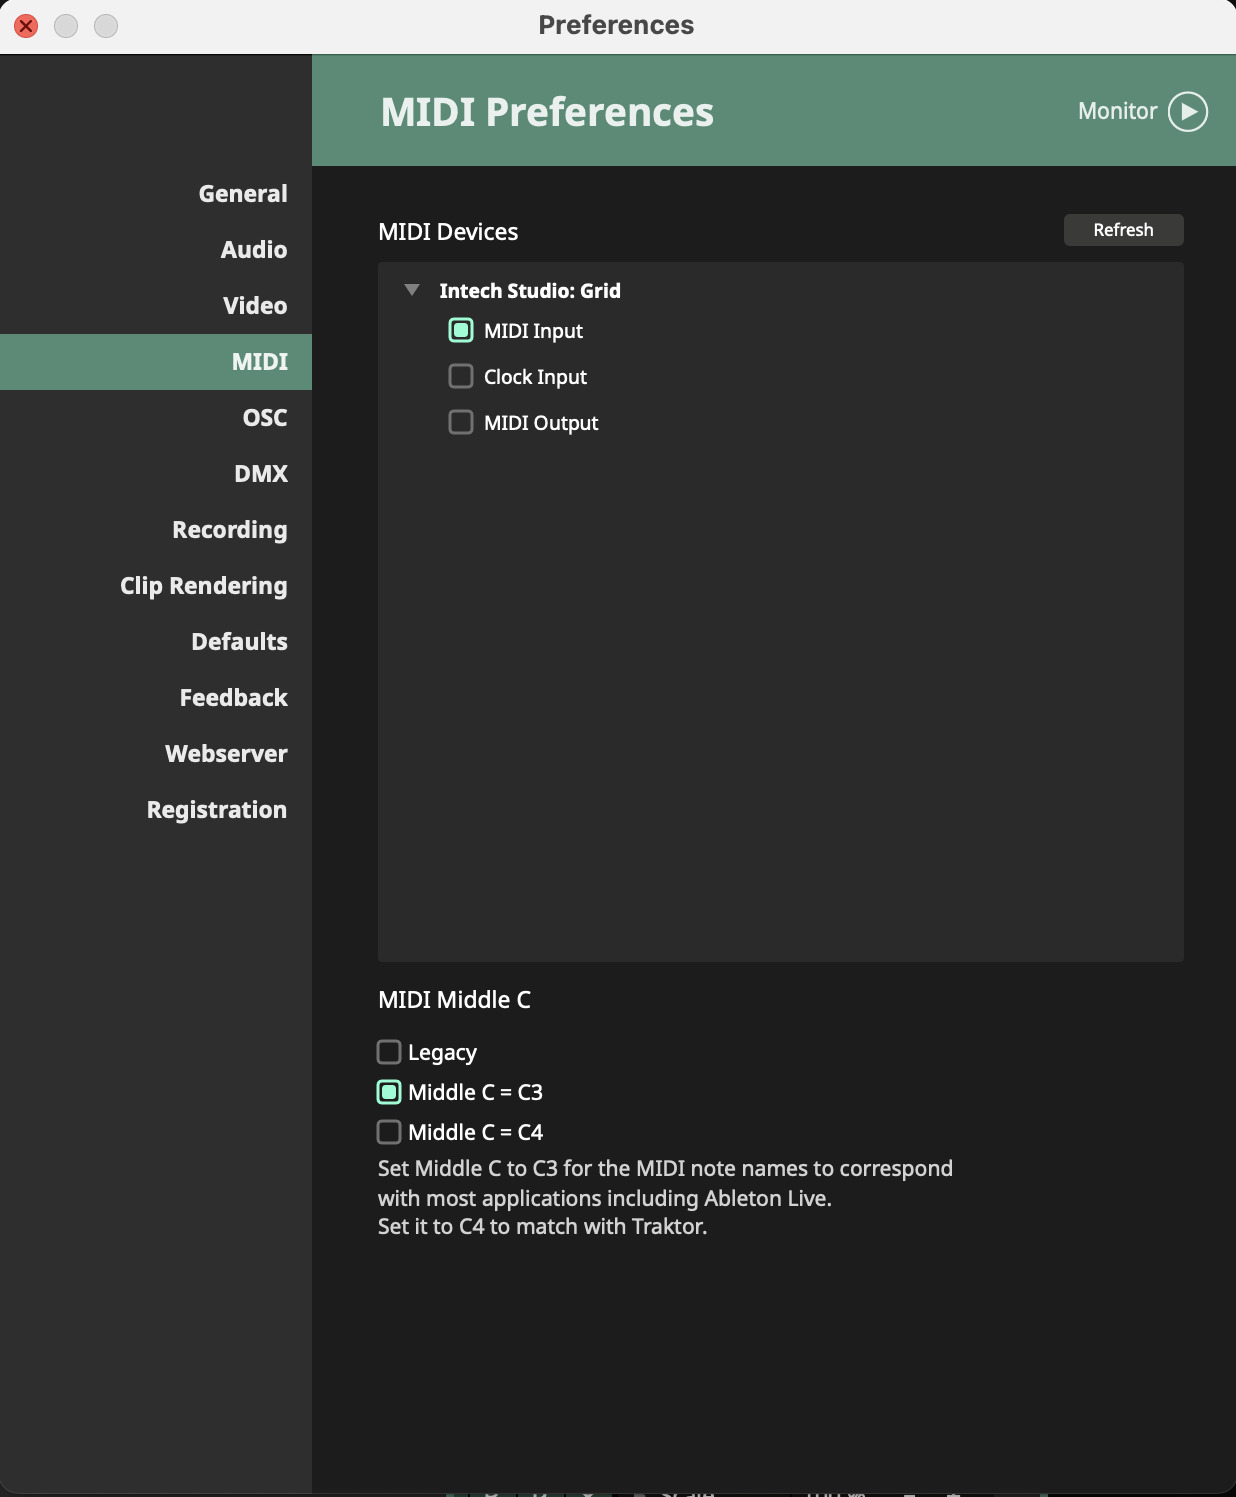
Once within Logic, open Preferences and select MIDI -> Inputs. Here you should be able to see Grid or Intech Studio: Grid as an Input device. Enable it if it's not already enabled.
and open up Options/MIDI Settings and under MIDI we'll find all our MIDI gear that's connected to the computer.
Here we should find our Grid module named 'Grid' or 'Intech Studio: AC'.
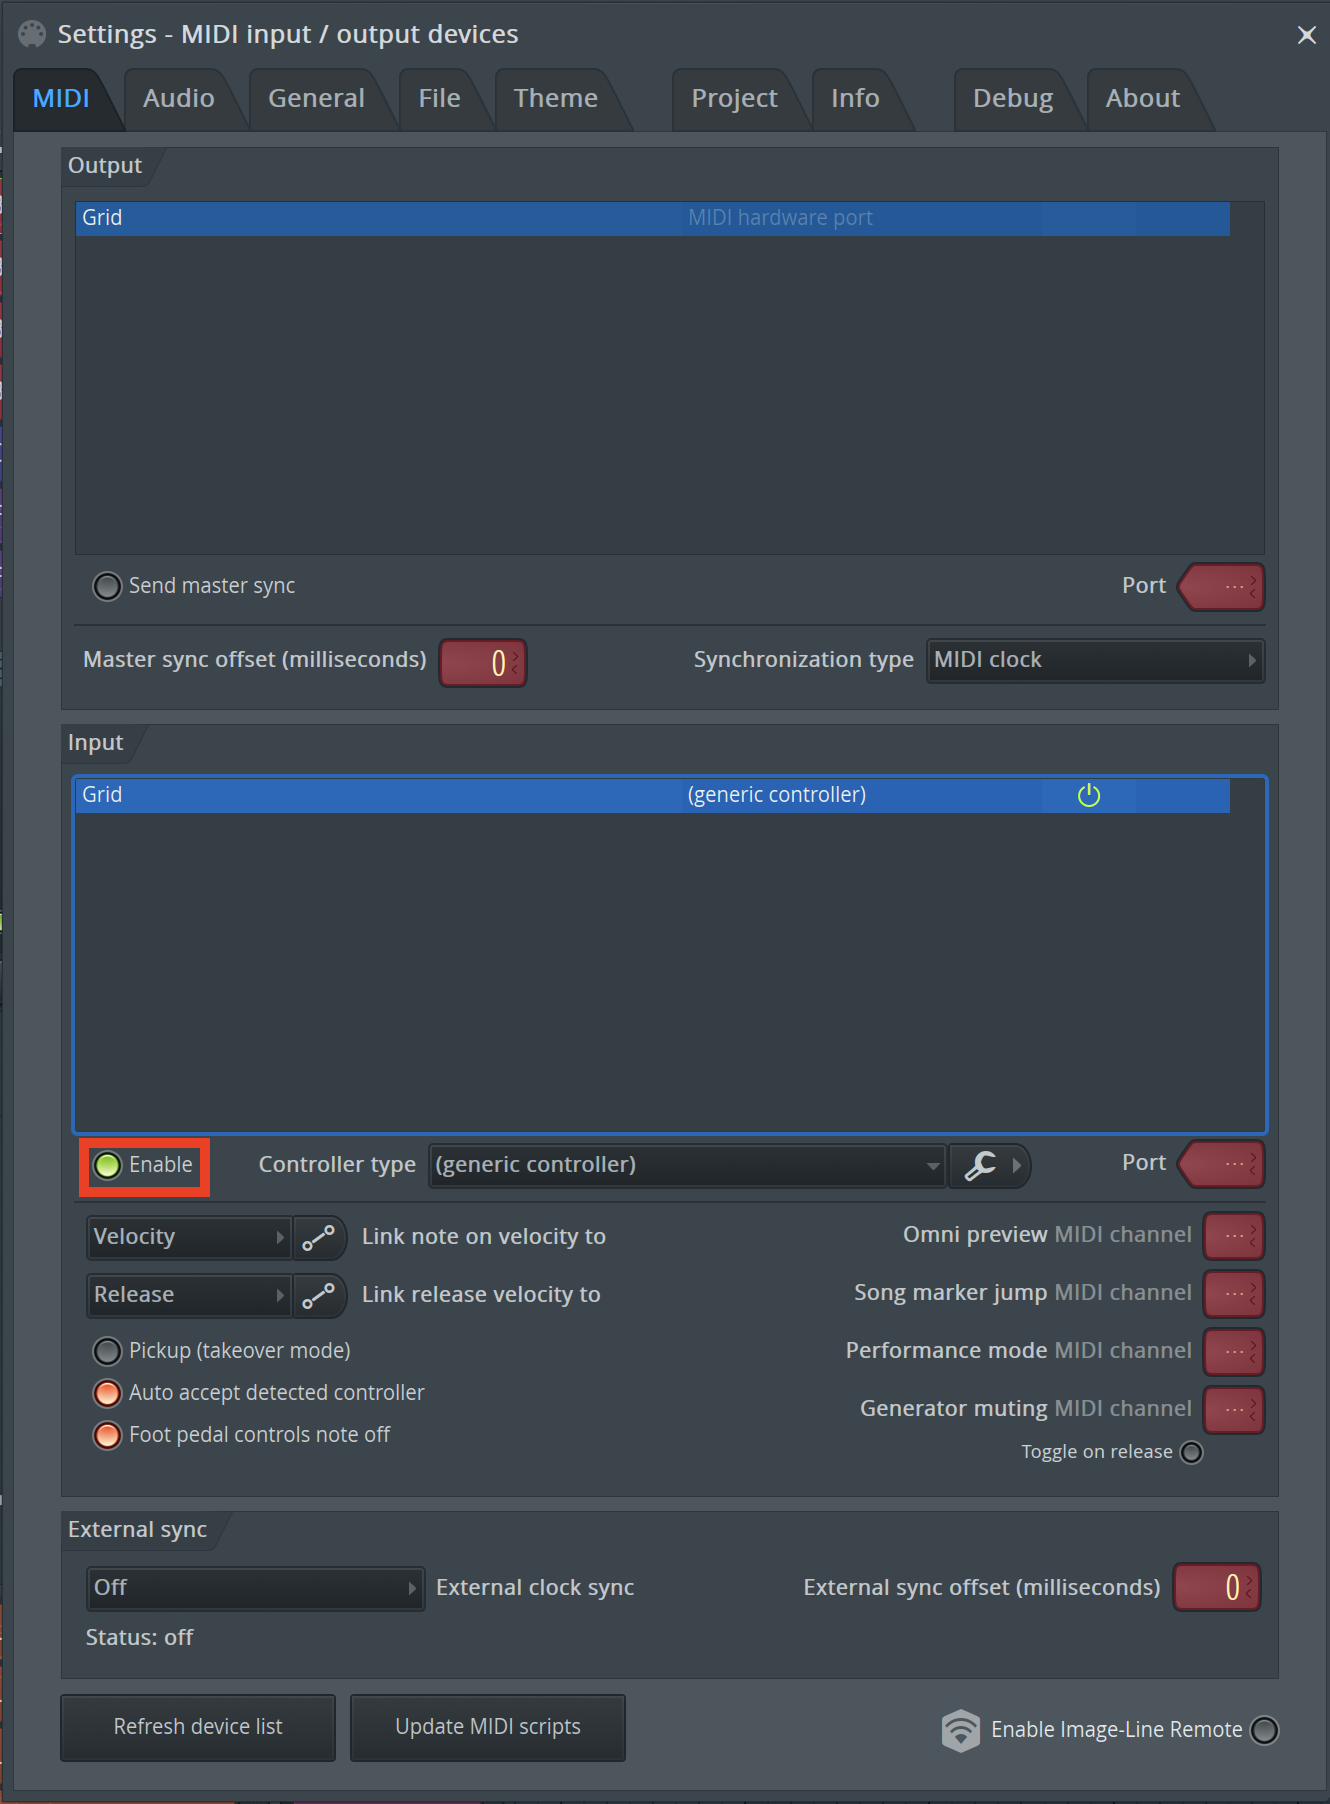
Select the Grid module under Input and click Enable. Once enabled, the Grid can send MIDI messages to FL Studio.
Connecting Grid to Pro Tools
- Connect Grid to your computer using a USB cable.
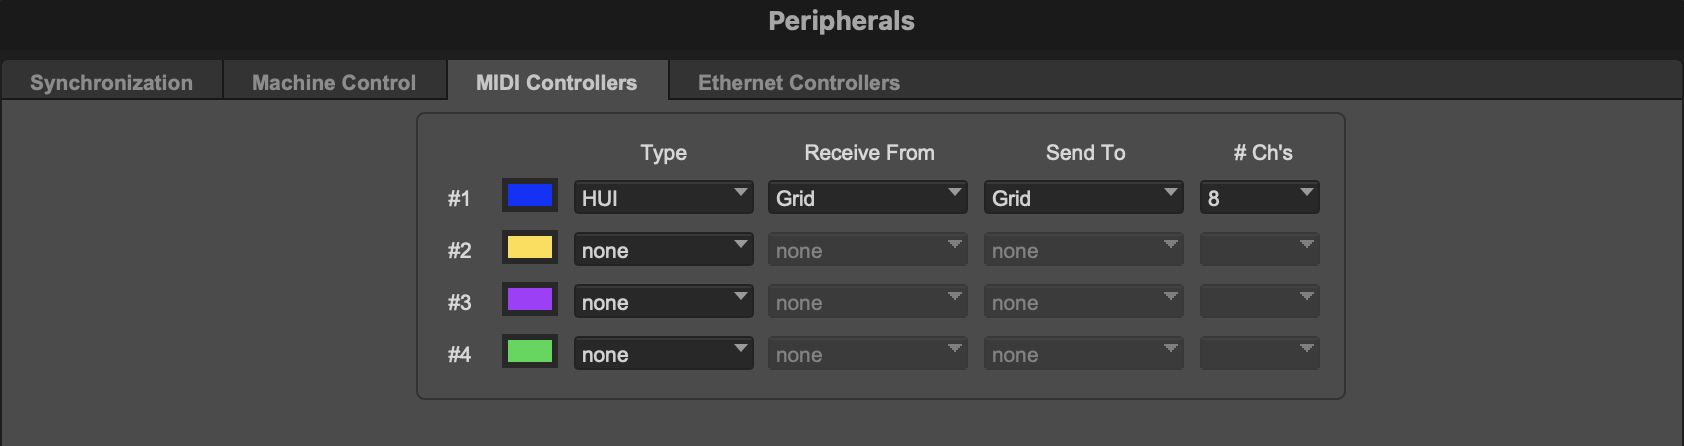
- Open Pro Tools and go to Setup > Peripherals.
- In the MIDI Controllers section, select:
- Type: HUI
- Receive From: Grid
- Send To: Grid
- Press OK to save the settings. If prompted about MIDI setup, click Don’t Show Again.
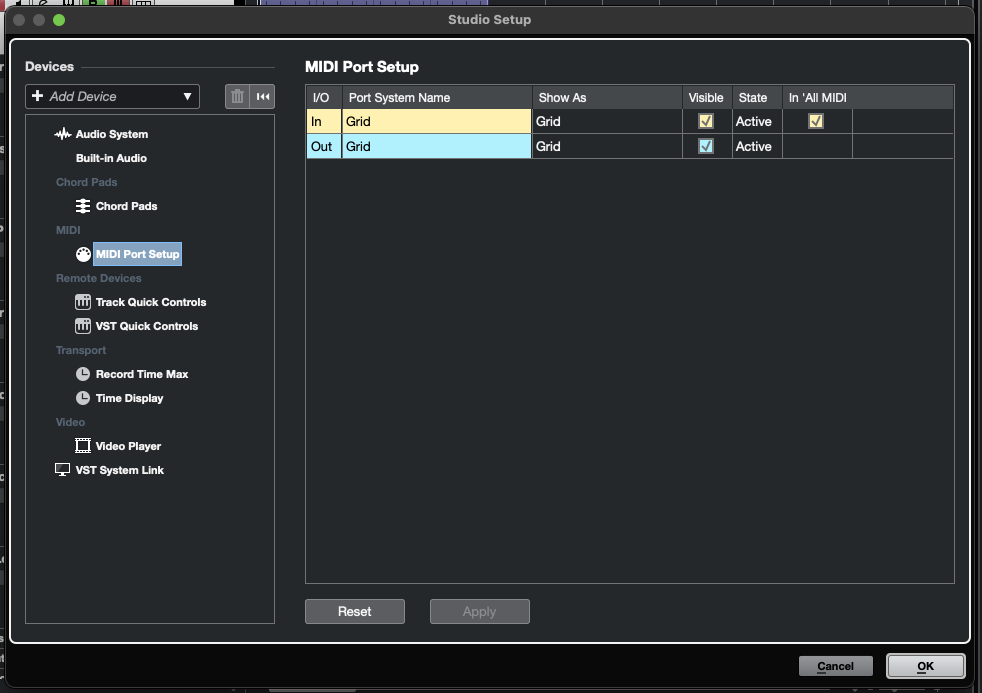
select Studio -> Studio Setup..., to upen up the Studio Setup panel, where general MIDI configurations can be viewed.
Select the MIDI Port Setup tab, and check if your Grid controller is listed under MIDI Input. If you don't see Grid listed there, check the troubleshooting articles.
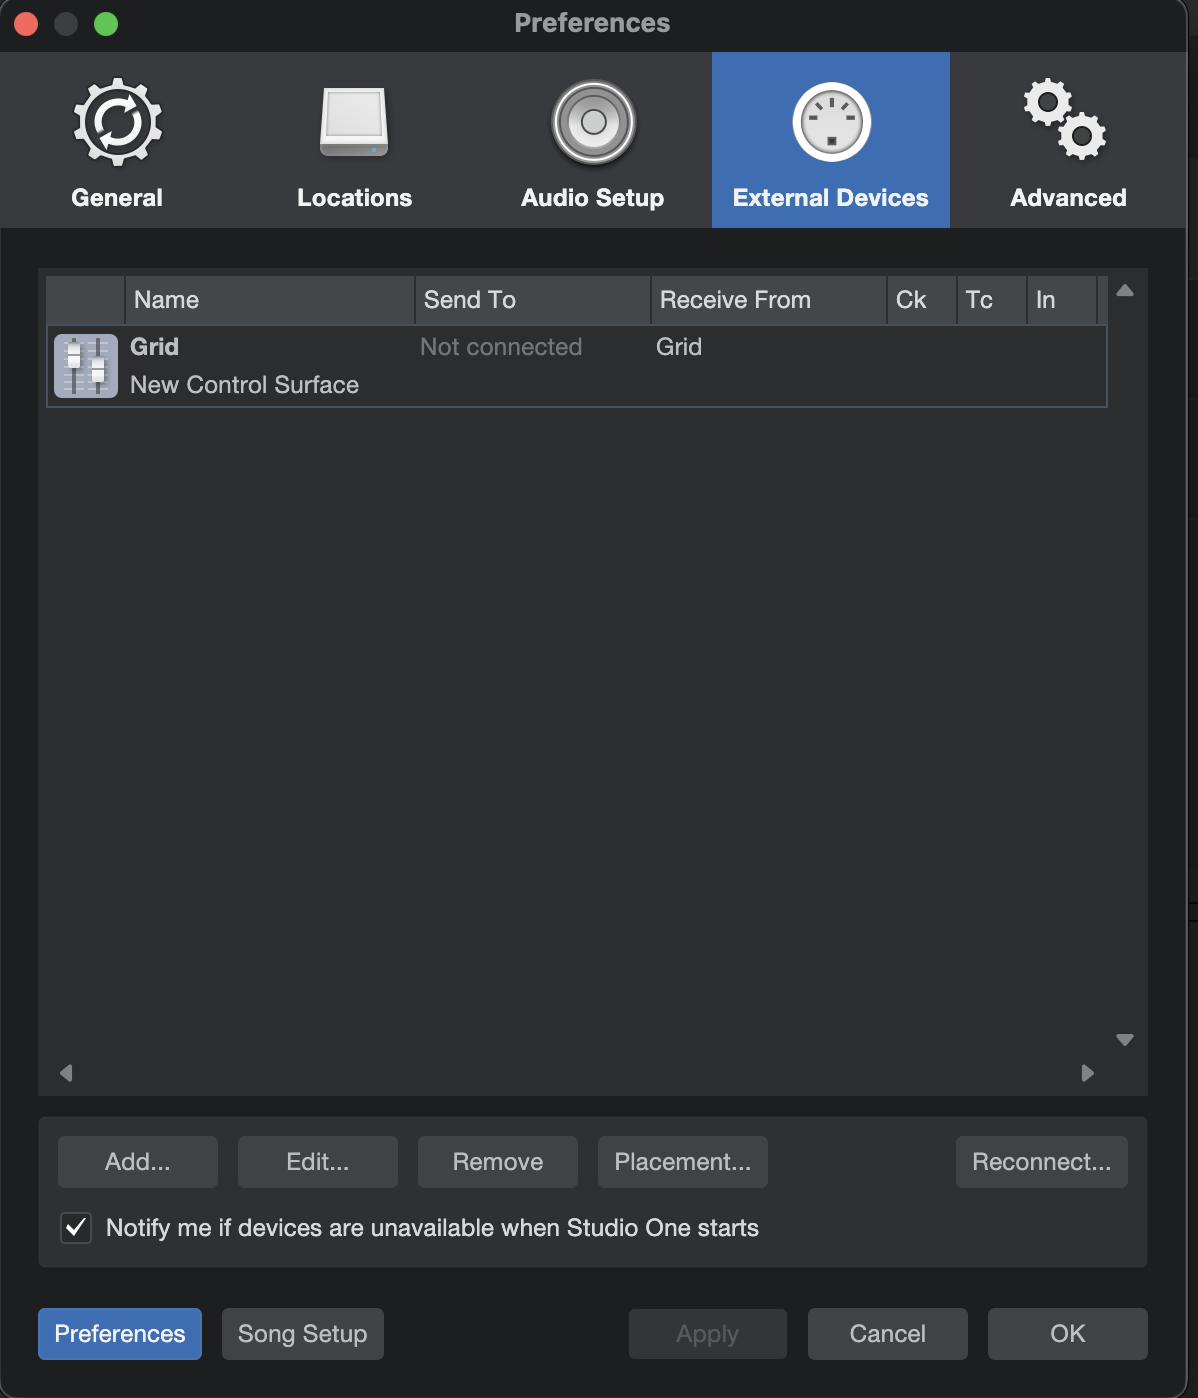
and open Preferences/External Devices and click on "Add...". Then, choose "New Control Surface" from the options. In the 'Receive From' dropdown menu, select either 'Grid' or 'Intech Studio: AC'. Next, provide a name for the device, such as "Grid", and click OK.
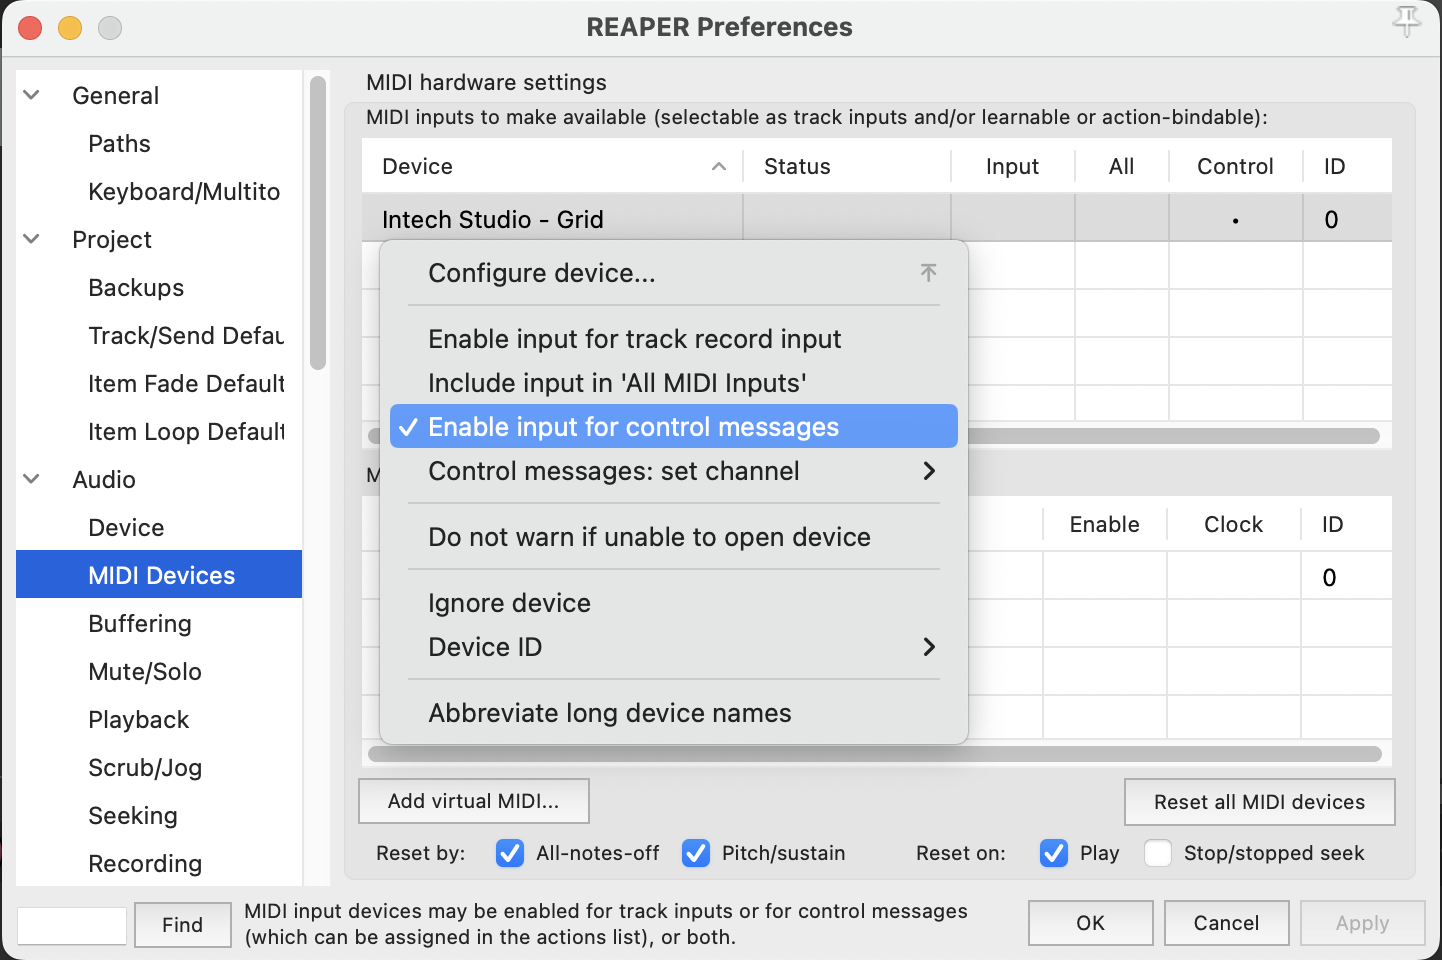
If not, click "Reset all MIDI devices". On Midi inputs, right click the Grid module and enable input for control messages.
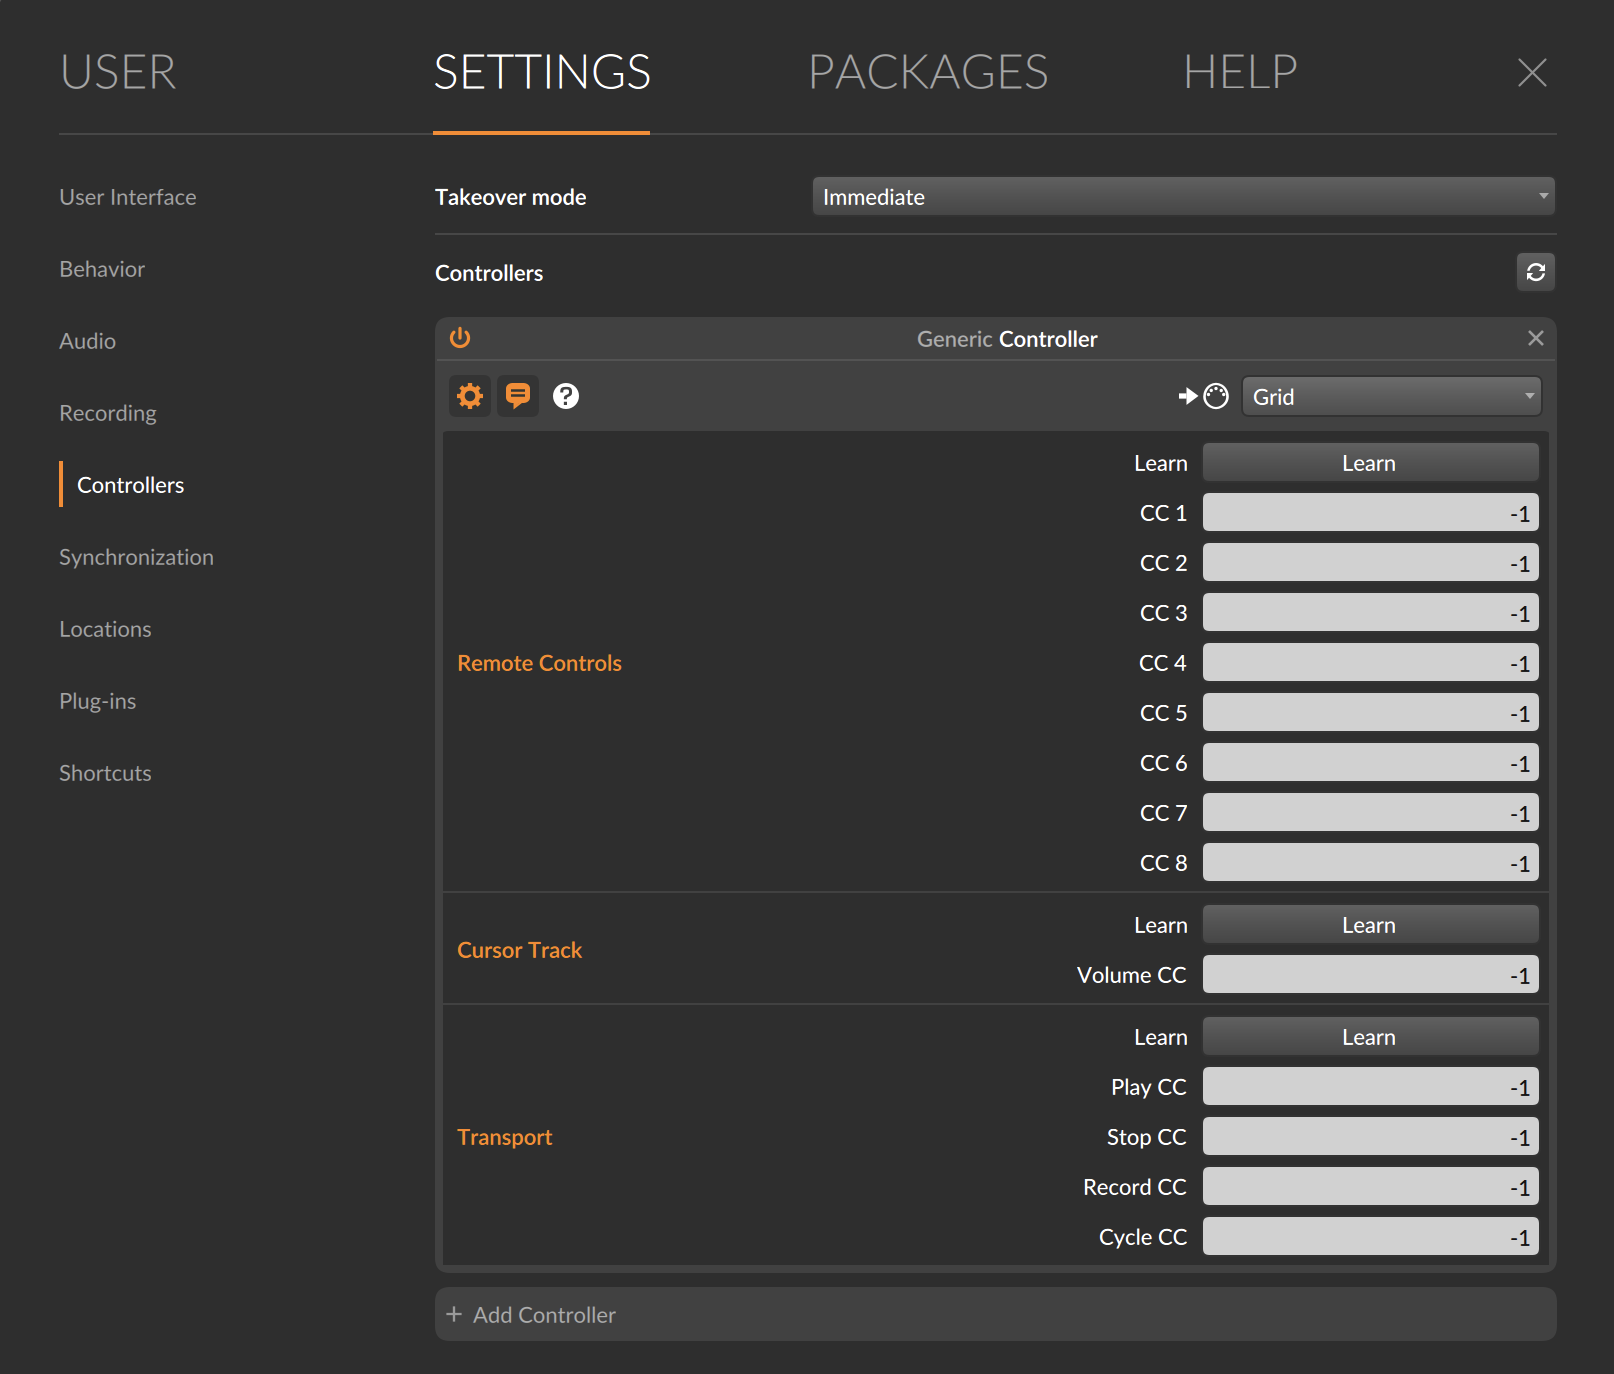
and navigate to Settings/Controllers, then click on "+Add Controller" under the Controllers section. Choose "Generic" under Hardware Vendor, and proceed to add the Grid module named 'Grid' or 'Intech Studio: AC'.
MIDI mapping
So after we have Grid enabled as a MIDI device we can send messages to the software and for that we have to choose which settings we'd like to control.
- Ableton
- Logic
- FL Studio
- ProTools
- Cubase
- Studio One
- Reaper
- Bitwig
- Arena
Clicking the MIDI button in the top right turns all the MIDI-mappable settings to a slightly blueish color.


When you click on any element, you activate MIDI learn mode in. This mode waits for a MIDI CC message from the controller. After interacting with any control element on your module, Ableton displays the MIDI assignment on the left side.
Map all the other control elements to parameters in Ableton the same way and voilá you're all configured. You can then exit MIDI learn mode safely.
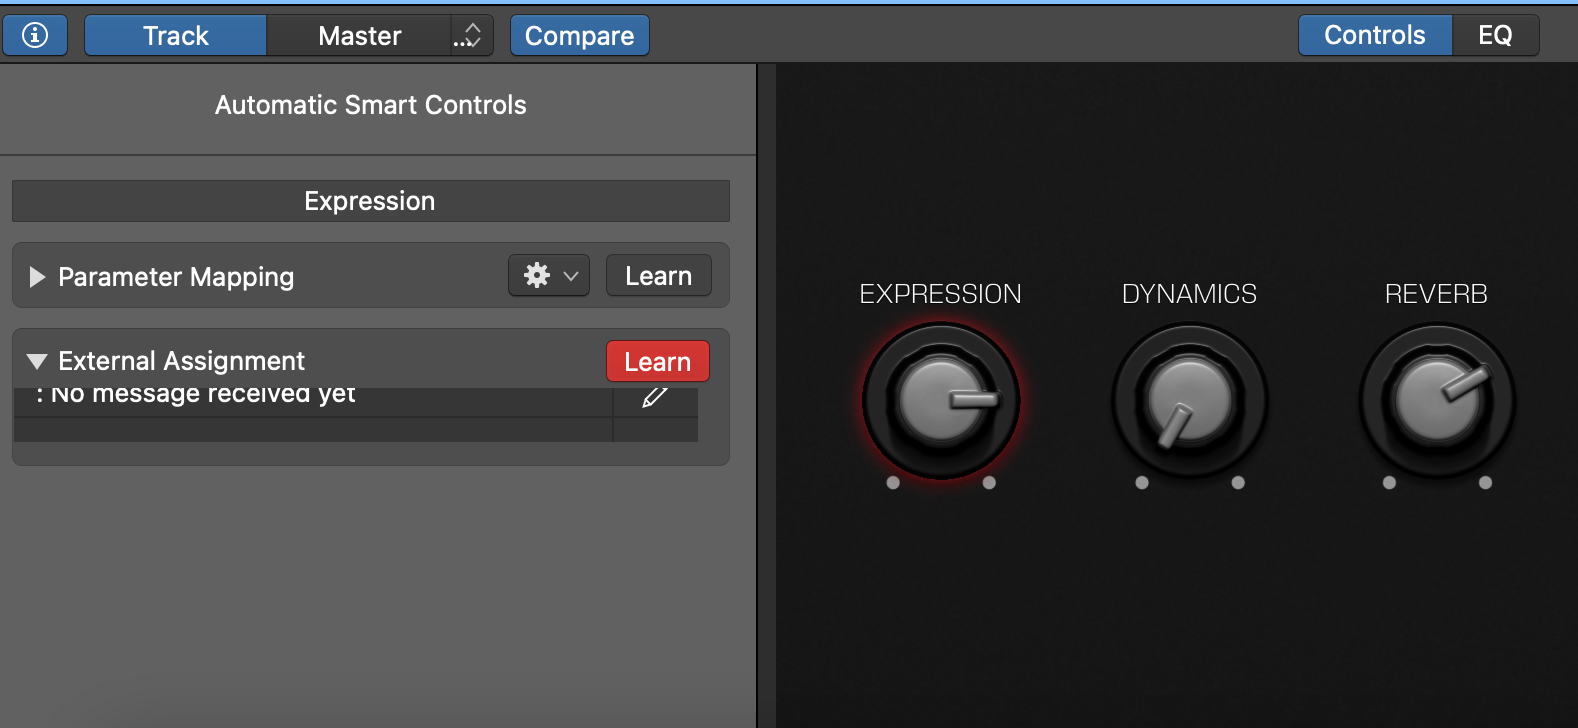
Mapping a control element on Grid to a parameter in Logic is easy.
- Select the track you want to control and pressing
Bon your keyboard to bring up the Smart Controls panel. - Click the small
(i)button in the top left to open up Automatic Smart Controls. - Click on any of the parameters on the right you wish to control like Expression for example, then click on the Learn button under External Assignments. The representation of this parameter should now turn red along with the Learn button.
- Turn or slide the element on your Grid controller to map it to this parameter. Turn off Learn.
- Now your Grid should control this parameter.
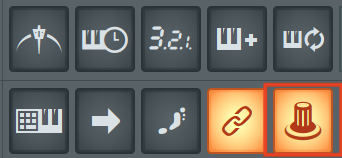
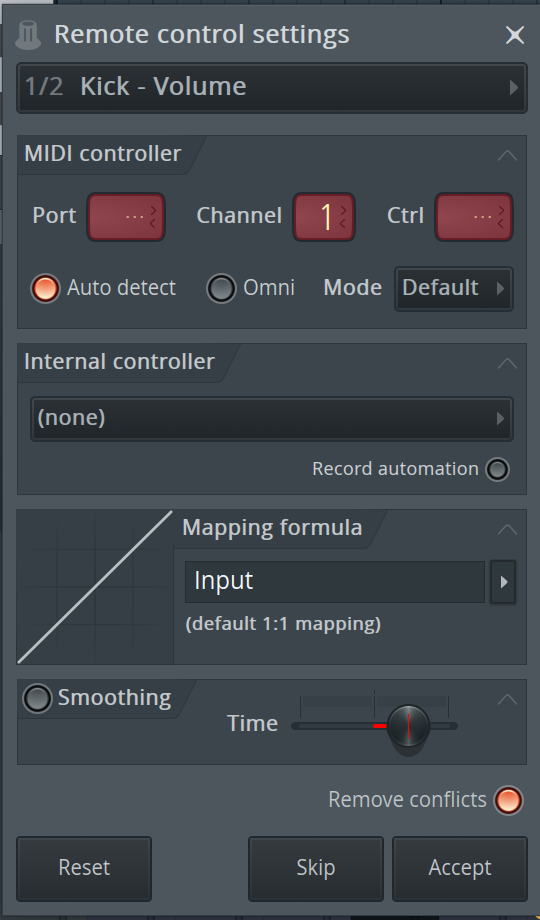
First, enable Multilink and move the parameters you wish to control. Once you've moved, click Multilink once more.
This action will prompt the Remote Control Settings window to appear. Simply move the Grid knobs or faders, and they will automatically map to the displayed destination.
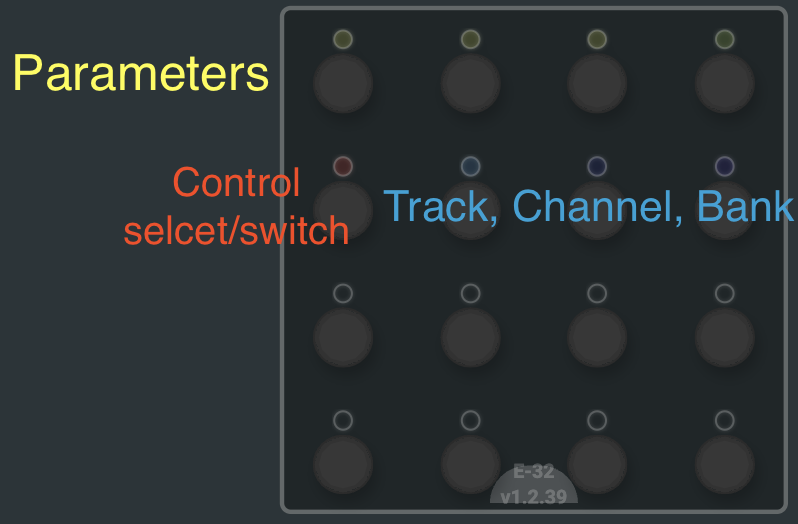
EN16 Plugin Control
Overview
The EN16 now supports a plugin control feature using the HUI protocol, enabling the control of up to four parameters and the ability to select which parameters to control. Additionally, features for selecting banks, channels, and tracks have been implemented for enhanced functionality.
In the Grid Editor, open the Profile Cloud and upload the HUI Protools Plugin Control to your EN16.
Features
- Parameter Control
- The HUI protocol allows you to control up to 4 parameters at a time.
- Switch between different banks, channels, and tracks.
- Insert Selection
- Assign parameter control buttons to select inserts A, B, C, and D.
- How to Activate Plugin Control
Activate Control Mode
- Press the select/switch encoder to activate plugin control.
Insert Selection
- Press the select/switch encoder again. - Use parameter control buttons to select inserts A, B, C, or D.
Cubase has a feature called Quick Controls, which allows 8 control elements to be mapped. It allows you to select specific parameters on a channel which you want to control. You can assign MIDI messages to these parameters, and control them with your Grid controller.
Tick in the Learn checkbox, and move a knob on your Grid controller. The Learn checkbox will enable MIDI learn in Cubase, so your interaction with the control elements are recorded. Click on a row, tweak a control element, repeat.
In each Quick Control row, under the flags the R should be activated, so the MIDI messages are received by Cubase. If we want to send MIDI messages back to Grid, the T flag should be activated too.
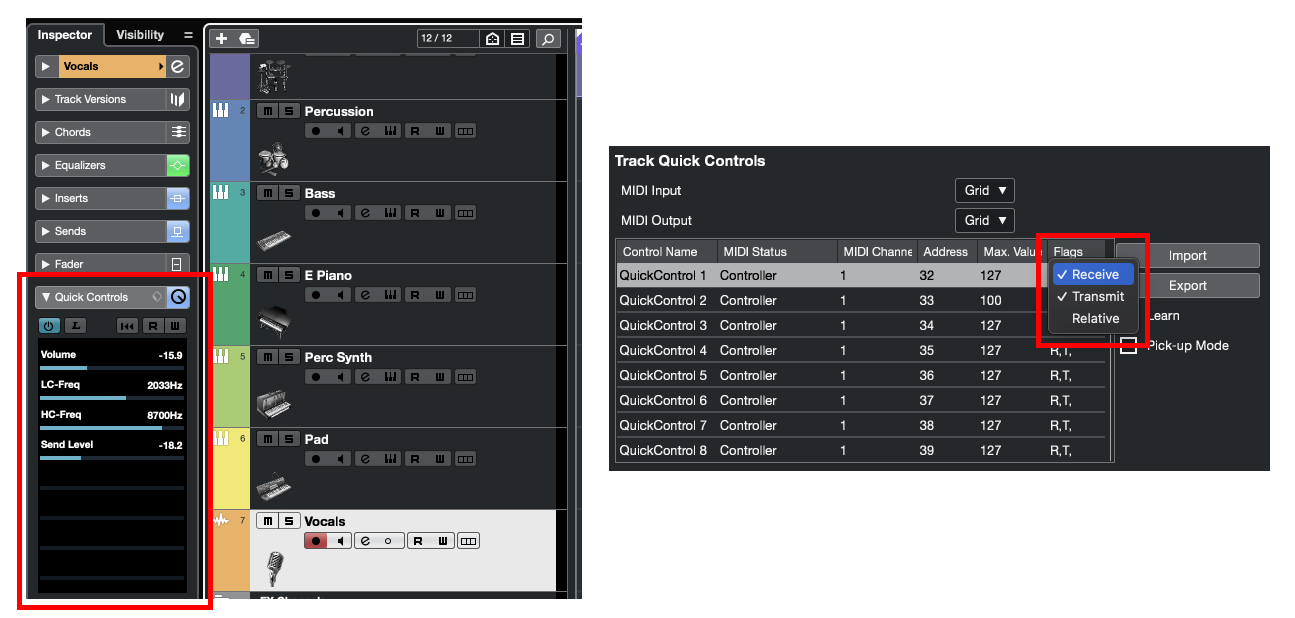
Right: Transmit and Receive are activated, so MIDI values can be received and sent back to Grid
- Open the Mixer view by clicking on the button located in the lower right corner under the browser.
- On the left side, select "Show External Devices" and open up the Grid interface.
- Click on "MIDI Learn" and manipulate the faders, potentiometers, or buttons as needed, then close the MIDI Learn function.

To assign a parameter eg: volume fader, to control with the Grid: move a control on Grid then right click on a fader and choose "Assign 'Volume' to Controlx on Grid".
 Assign to fader
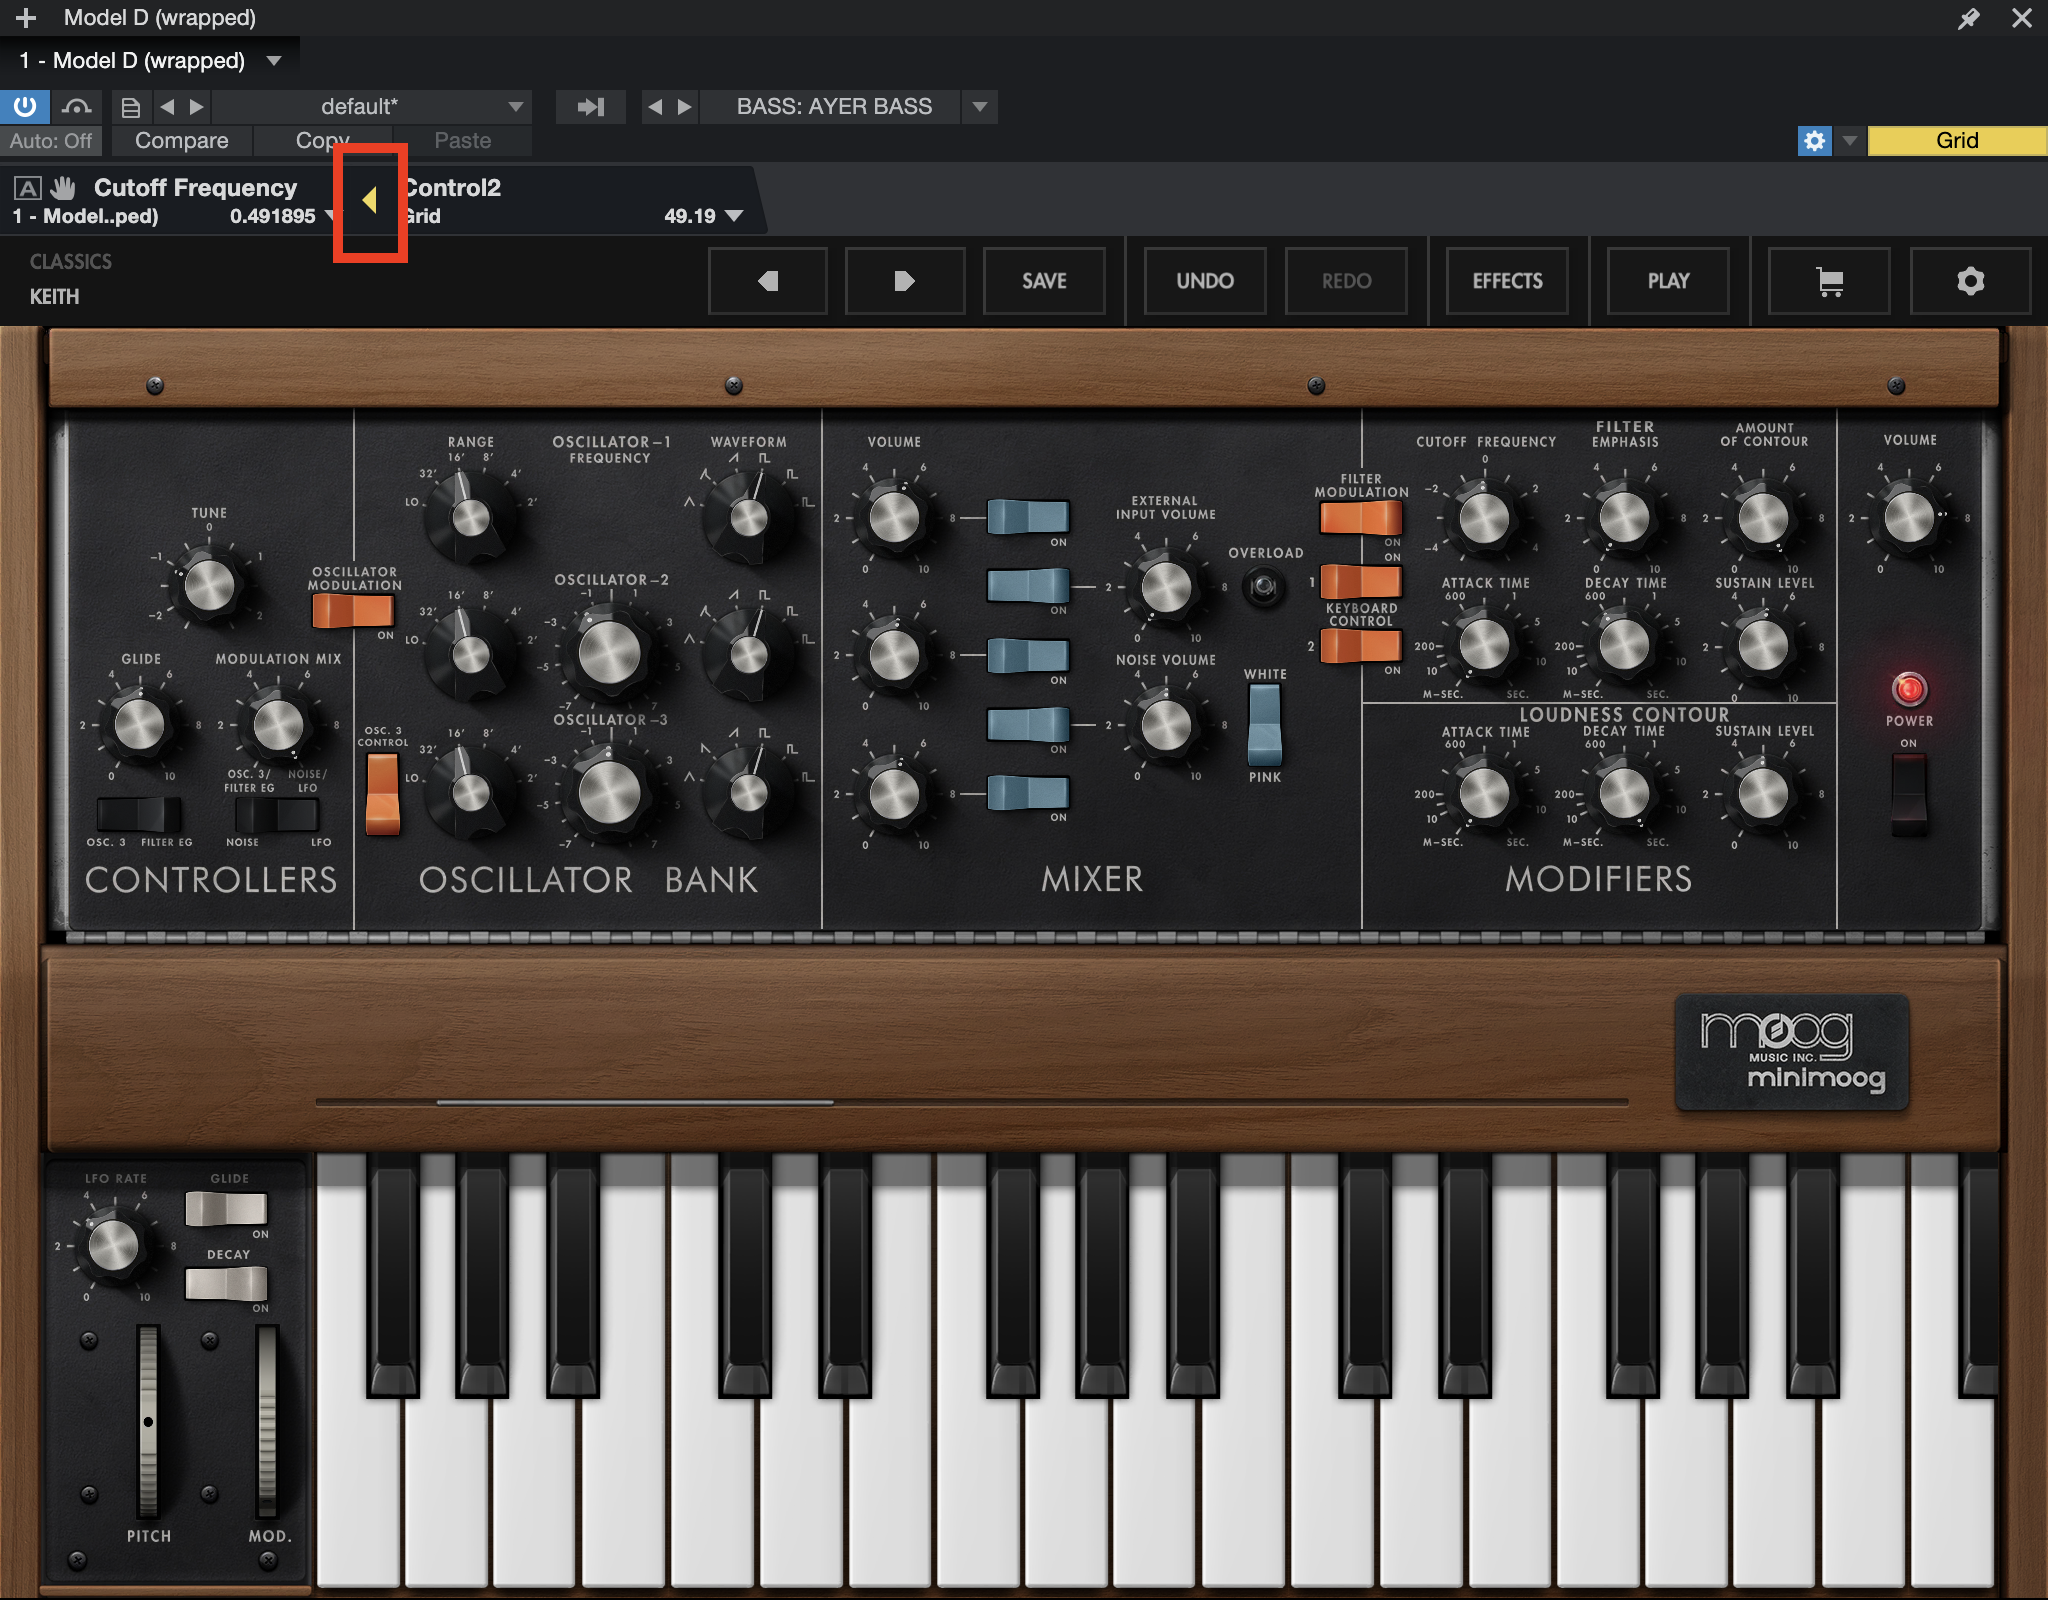
Let's assign a Grid potentiometer to a parameter on a VST synth. Open the synth and in the top right next to Grid, open the mapping interface. Once opened, move the Cutoff Frequency parameter, then move a potentiometer on the Grid. In the top left corner, you'll see the two parameters; click on "Assign." From now on, you can control the Cutoff frequency from the Grid module.
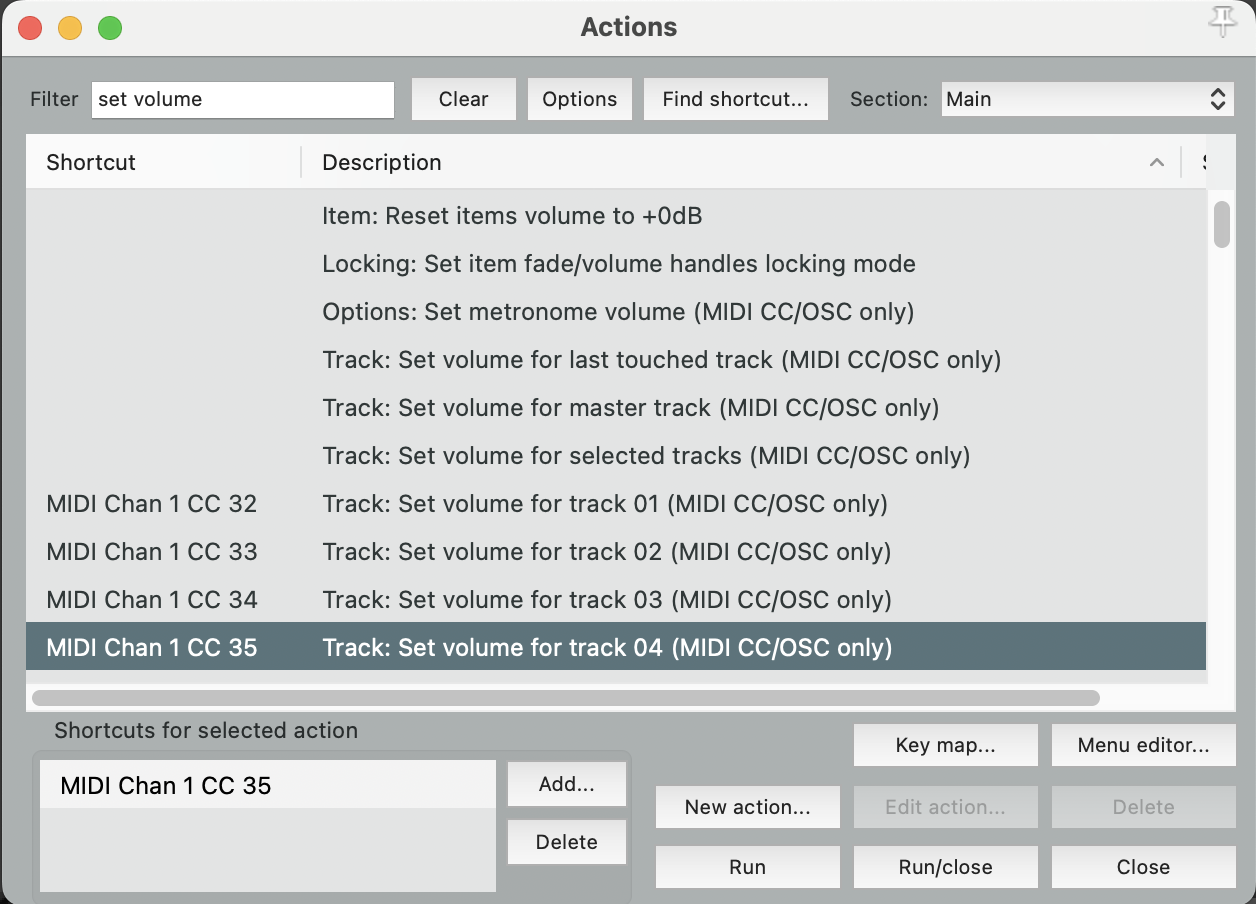
Open the Action List (Action/Show action list...) and filter for "set volume". Select one of the "Track: Set volume for track x (MIDI CC only)" and under the "Shortcuts for selected action" click "Add...". Then move the controller you wish to use and it will assign that action, then press OK.
Now when you move that controller, the fader moves. You can set one controller to adjust the mixer faders on any selected track, the last touched track or set multiple controllers to control multiple tracks.
When click on "Learn" you activate MIDI learn mode. This mode waits for a MIDI CC message from the controller. After interacting with any control element on your module, Bitwig displays the MIDI assignment.
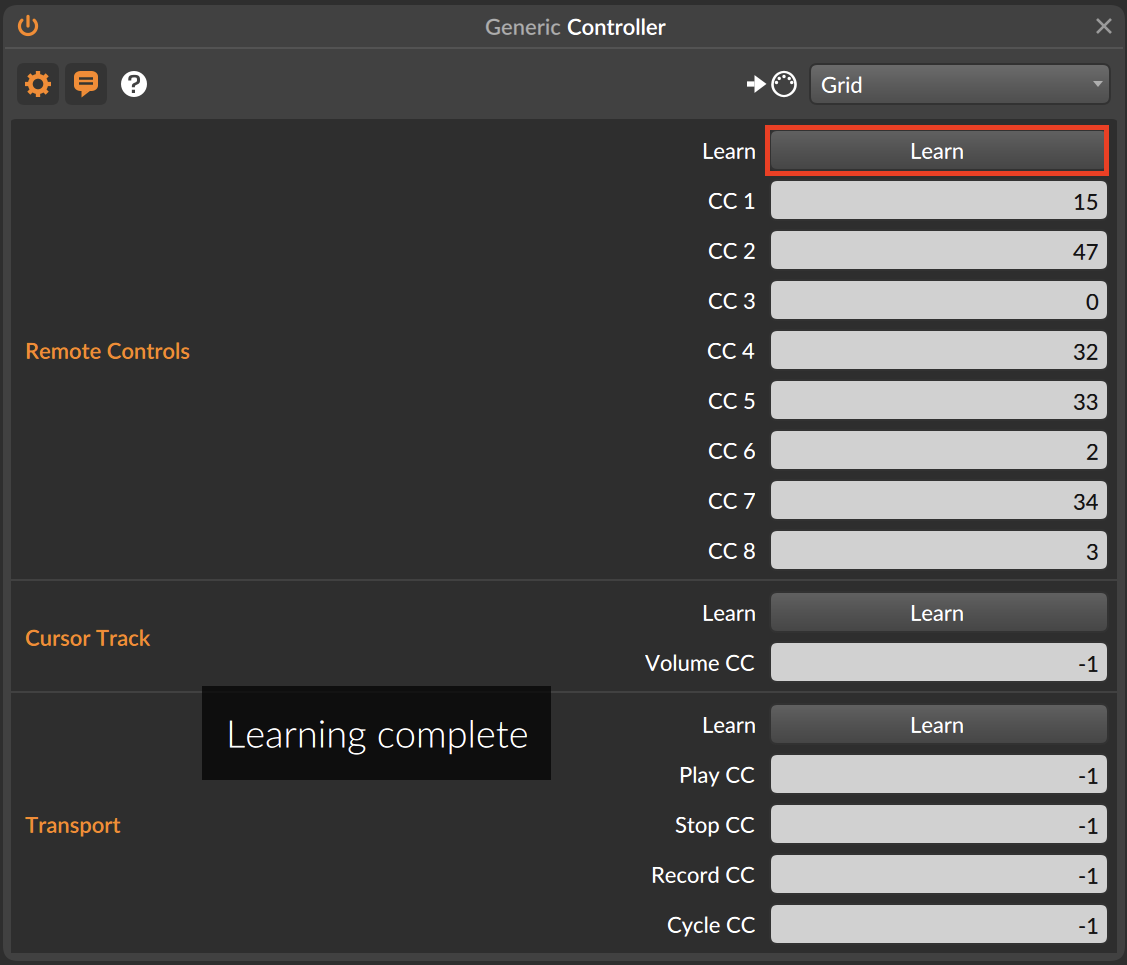
Now you have a generic configuration.
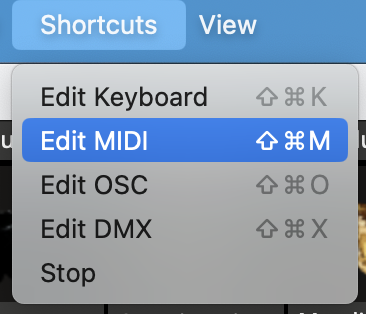
Then open up Midi mapping: Shortcuts/Edit MIDI
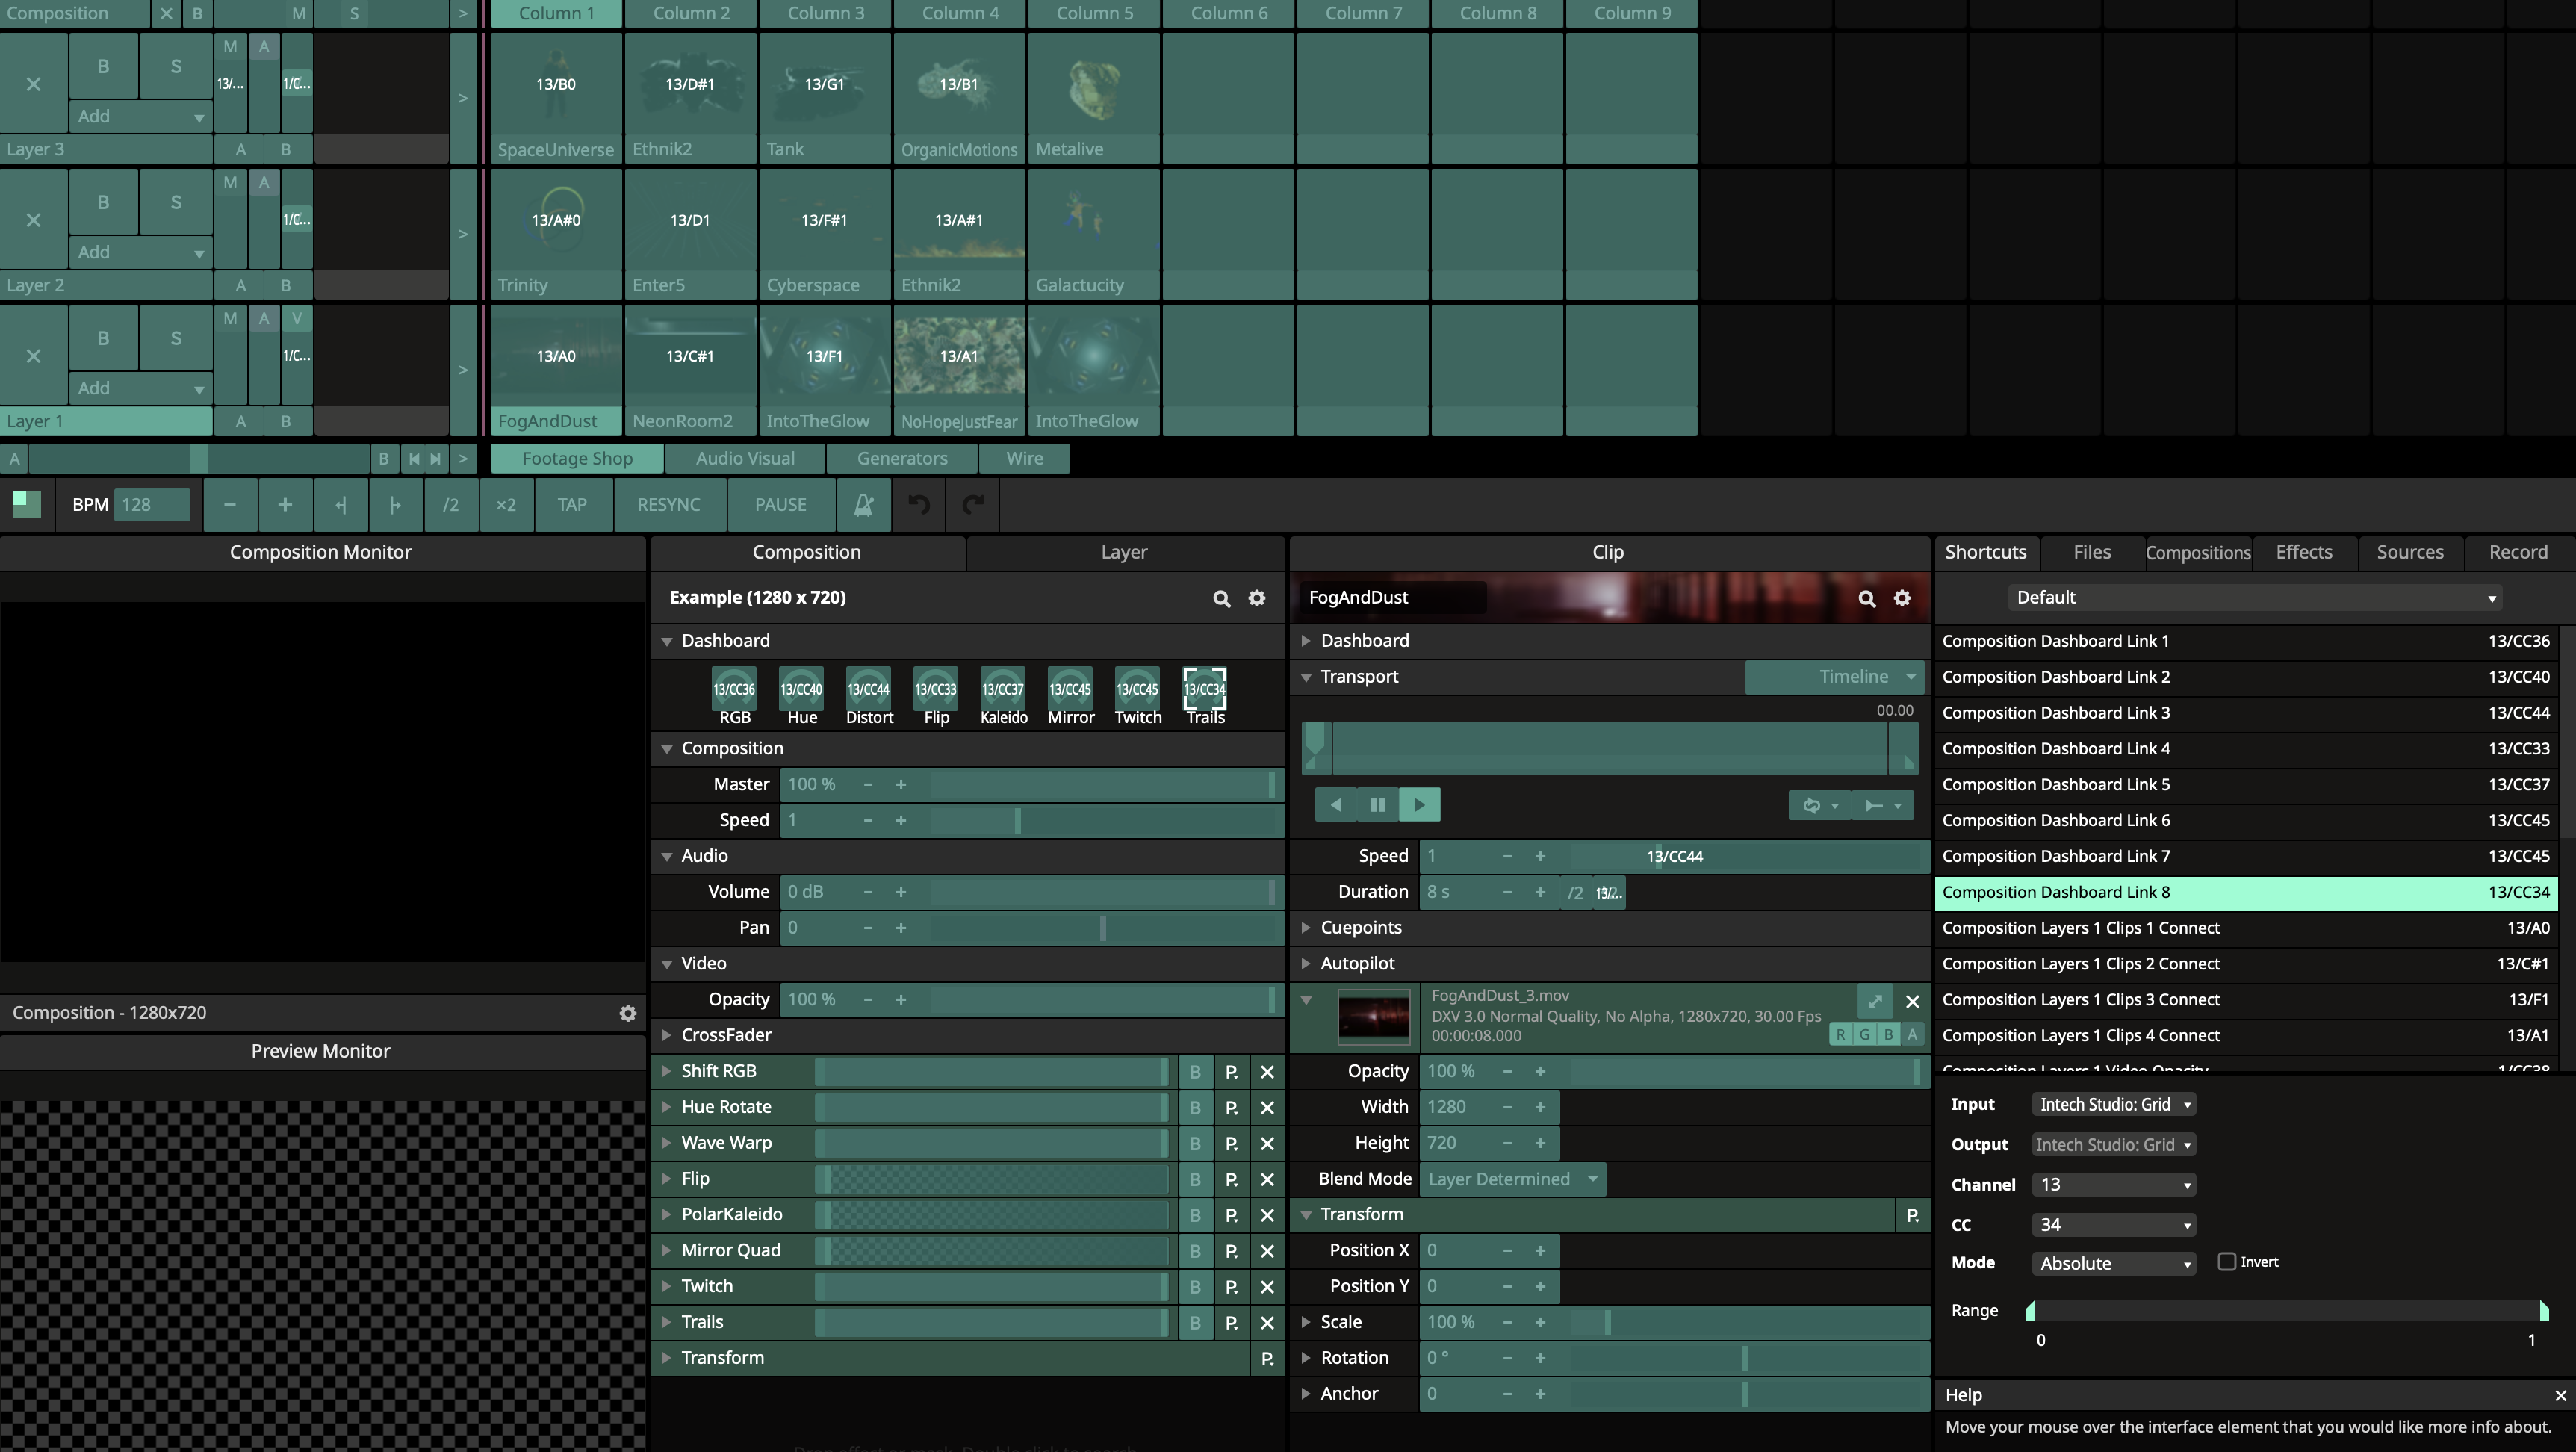
To control Resolume Arena effectively, use EF44 for layer mixing and EN16 for scene triggering and parameter adjustments, as this combination provides efficient control over the software's functions.
Now you have a generic configuration.
For anything more complex than just the plug-and-play experience please take a look at Grid Editor!